Call today


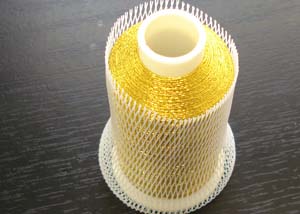
If you are having trouble finding the beginning of your Marathon embroidery thread, please view this pdf document How to find start of spool and also watch this video.
Used with the kind permission of Marathon Threads Canada.
Choose the right stabilizer for the best results on any project.
The purpose of using a stabilizer is to support the embroidery on the fabric and to prevent distortion. Usually the stabilizer is placed under the fabric during the embroidery process, and the excess is cut away, torn away, or treated with water or heat to completely remove it; therefore, stabilizers are available as cutaway, tearaway, water soluble, or heat-away. Some stabilizers are available with a heat-sensitive fusible backing, water-sensitive fusing, or with a tearaway backing to expose a sticky surface. Fusibles can be used to add stability to stretchy or fine fabrics before hooping. Stabilizers are also available in different weights, from lightweight to medium to heavy.
The weight of the stabilizer should be similar to the weight of the fabric, but you should also consider the stretch of the fabric, the density of the embroidery, and the way the embroidered article will be used and cared for. Thicker and more stable fabrics can support the embroidery stitches and require only a lightweight tearaway stabilizer and some require no stabilizer. Softer, thinner, or stretchy fabrics require cutaway stabilizer to support the embroidery stitches and to make the embroidery more attractive, durable, and washable. More dense embroidery requires a heavier stabilizer. Topping films should be used when the fabric has a pile or nap to avoid fabric threads from appearing within the embroidery. (Changing from a satin stitch to a fill stitch also controls the base fabric from migrating into the embroidery).
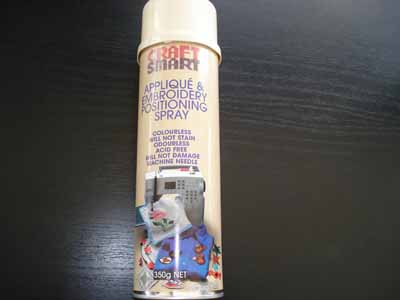
In some cases, hooping the fabric is not the best choice. Thick or stiff fabrics may be difficult to hoop. Some fabrics with a nap e.g. velvet may be damaged by the hoop. Stretchy fabrics recover their original size after being stretched in the hoop making the design ripple and not sit flat. In all these cases, you can hoop the stabilizer and lay the fabric on top before embroidering. Double-sided adhesive tape (our item #949) can be used for many of these applications, or you can use very careful placement of pins outside of the design area.
For a good reference book on all your embroidery needs, we recommend our item #1705 Creative Beginnings in Machine Embroidery by Patty Albin. This book gives a great overview of what supplies are needed and tips on how to use many things like scissors, needles, stabilizers, not to mention pictures as to why your designs may be puckering. A must for every machine embroiderer.
Cutaway Stabilizers
Cutaway Stabilizers give permanent support to the fabric and embroidery. They cushion the design adding dimension and durability. Choose the best weight to provide the amount of support required. Dense embroidery requires a heavier stabilizer. Stretchy or thin fabrics require very stable support from the stabilizer; therefore, consider using a fusible stabilizer, a sticky-back stabilizer, or a spray fabric adhesive to attach non-fusible the stabilizer to the fabric before hooping. Trim cutaway stabilizers close to the stitching or leave 1/8 to 1/4 inch around the embroidery to support the outline. Cutaway stabilizers are usually more comfortable against the skin compared to tearaway stabilizers, so consider using them on garments and baby clothes.
Marathon Threads Canada carries several weights of cutaway, and also carries fusibles:
C-62A Medium Weight Cutaway: Our softest cutaway. Suitable for garments and baby clothes. Available in 15" x 50 yards. This stabilizer is good for designs between approximately 12,000 to 17,000 stitches
C-82HD Heavy Weight Cutaway: Brought in due to customer demand. Similar to our old style C-71A! Soft feel for fleece, blankets, or heavy woven fabrics! Excellent for designs with denser stitching. Available in 22" x 50 yards and 12" x 50 yards. This stabilizer is recommended for designs with 25,000 to 30,000 stitches approximately.
EB625 Black Non Woven Medium-Heavy Weight: An excellent cutaway for your darker projects. Available in 10 yds x 15".
"No Show" Nylon Mesh: Available in fusible and non-fusible, was specifically developed for left-chest logo applications and to minimize stabilizer show-through on fabrics. Ideal for lightweight knits or sheer fabrics, and the fusible version can be used to cover scratchy stitches on the back of finished embroidery. This stabilizer is recommended for designs of about 10,000 to 12,000 stitches. You can also add a tearaway with this and you could do up to 18,000 stitches. Some of our customers have mentioned that they simply double the nylon mesh if they have something very dense. **Please note that the diagonal No Show Nylon mesh has been discontinued.. We still have some in stock.
SF-1 Fusible Cutaway: A non-woven, lightweight fusible. It supports the fabric during stitching. Adds stability to stretchy or fine fabrics before hooping. Reheat with an iron before gently lifting the stabilizer from the fabric for trimming excess. Available in 2 sizes 22" x 100 yards and 12" x 25 yards.
Lite Steam-A-Seam 2: Made especially for sheer and lightweight fabrics. A favorite for both and hand machine appliqué. Sticks temporarily (both sides when applied) and sticks permanently when ironed. Comes in packages of 5 sheets of 9" x 12".
Tearaway Stabilizers
Tearaway Stabilizers are used on fabrics that require support during the embroidery stitching, but they don't need support after the design has been stitched. Excess can be gently torn away close to the stitching. All of our tearaway stabilizers tear away easily in all directions.
EM-40 Non Woven, Light Weight: Available in two sizes, 22" x 100 yards as well as 12" x 50 yards.
EM-40 BLACK Non Woven, Light Weight. Available in one size 15" x 50 yards.
EM-80 Non Woven, Medium Weight: Available in two popular sizes, 22" x 50 yards and 15" x 25 yards.
HX90 Non Woven, Extra Heavy Weight: Perfect for making caps, 22" x 100 yards".
HINT: If you notice any puckering or distortion of the design:
RinsAway: Performs like a regular tearaway, except any remaining stabilizer will wash away after several launderings. Use it when you don't want any stabilizer remaining on the back of the fabric.
Press N Tear: A tearaway with a paper release backing and pressure sensitive adhesive. It eliminates the need for double-sided tape to hold small or bulky items to the hooped stabilizer. It also makes it easier to place small items in the correct position in the hoop e.g. when embroidering a delicate embroidery on a baby collar. Just hoop your Press N Tear, peel back the paper and stick your item down to it. Carefully peel back the excess stabilizer and tear away as usual. Now available in FOUR sizes 8" x 10 yards, 12" x 10 yards, 18" x 10 yards and 19" x 10 yards.
Water-Soluble Stabilizers
Water-Soluble Stabilizers come in two types, films and mesh. Films are normally used as a topping film to control the pile on fabrics such as toweling, fleece, or velvet while embroidering. It allows the fibers of the fabric to be pressed flat for a nice clean design. Another stabilizer (cutaway, tearaway, or another layer of water-soluble stabilizer) is used under the fabric. Mesh types are used mostly for FSL (Free Standing Lace) as well as when you need to have a stabilizer present while embroidering but you do not want any stabilizer left once you are finished with your project.
H20 Gone / Wash-Away: A fabric-like stabilizer (mesh) that completely dissolves in water leaving no residue. Its unique fiber construction makes it suitable for lace, appliqués, and emblems. Soft fabric feel. Hoop with the article. Simply rinse under warm water. Can also be washed away in warm water or machine wash on delicate. Available in two sizes 12" x 25 yards and 15" x 25 yards. Linda’s favorite for FSL!!!
Embossed Cold Water Soluble Topping Film: Suitable for toweling or items with a pile or nap. The stitching cuts through the stabilizer, and some of the stabilizer will fall away by itself. You can gently tear away any remaining stabilizer or it will disappear with a spray of water or in the laundry. When the stabilizer is cut by the stitching it cuts down on finishing time. This is an advantage when embroidering monograms on towels, because the stabilizer controls the terry threads during stitching but falls from inside or between the letters e.g. O. If you use a tougher stabilizer, you may have to use tweezers or water to remove it. Available in one size 10" x 125 yards.
Solublon: Marathon's strongest water-soluble topping film. It's strong enough to be used as a backing stabilizer or for making free-standing lace (use multiple layers if necessary). Sturdy during stitching but dissolves in water. Its strength gives improved registration for finishing outline and details. Available in one size 10" x 125 yards.
Other Specialized Products
Cloud Cover Stitch: This is NOT a stabilizer but a backing. Fuse Cloud Cover Stitch over the back of a finished design to cover scratchy stitches on the backside of embroidery designs. It's soft and sheer - ideal for baby garments, golf shirts, or tees. Anywhere to avoid a scratchy irritant tot he skin!. Cloud Cover has a very unique multi directional stretch. It bonds at a moderate temperature with your fabric but will in no way adversely affect the bulk or drapability of your garment. It is also used on silks and satins in order to arrest any unraveling or shredding while sewing. New smaller size 11.5" x 10 yards.
Hot Melt Film (Melt Away) Iron-Away Stabilizer: Sticks to your non-teflon iron after embroidering. Great for freestanding lace, patches, appliqué, sweatshirts, toweling, etc. You can embroider directly on it. Use when you want the stabilizer to completely disappear after embroidering but you don't want to wet the fabric. This item replaces our Trick Film. Comes in a roll of 10" x 50 yards.
Double-Sided Adhesive Tape: Great to attach small or hard to hoop items to the hooped stabilizer. No hoop marks!!! No pin holes!!!
Marathon Threads Canada carries several types of needles. Having a sharp needle is one of the most important factors in machine embroidery. Note that the embroidery needle has a more elongated eye than a regular sewing needle. Marathon Threads Canada carries Organ home embroidery needles HAx1 or 15x1 with a flat shank or industrial DBxK5 with a round shank in a variety types and sizes in both sharp and ball point. Increase needle size for heavier fabrics. 75/11 or 80/12 are suitable for most light-weight fabrics. 90/14 is better for heavy fabrics such as denim and canvas.
Sharps: Sharp needles actually pierce the fabric. Sharp needles have to remain sharp to produce clean designs and prevent damage to fabrics. Replace your needles often. Also available in Titanium.
Titanium HAx1 PD or 15x1 PD Needles: A chrome needle with a titanium coating; flat shank for home embroidery and sewing machines, the titanium coating allows the needle to glide better, less friction. Ideal for longer projects or when you are sewing with difficult to work with threads.
Ball Point: Ball point needles pass between fabric fibers reducing the chance of marking or damaging the fabric. Use a ball point needle for knits to prevent runs or holes.
Metallic - Organ HAx1 ST or 15x1 ST Needle: It has an oversized eye that reduces stress and tension on the thread.
Top Stitching HAx130N: Chrome flat shank for home machines, ideal for decorative stitching. Has a bigger eye. Works well with heavier threads as well as embellishing threads.
Quilting- Organ HLx5: An industrial grade chrome needle. It has the flat shank for home machines. Suitable for quilting projects with multiple layers. Available in a variety of sizes. Some sizes also now available in Titanium.
Titanium HLx5 PD Needles: An industrial grade with a titanium coating flat shank needle, designed for quilting and sewing machines sewing heavy, thick or multiple layers.
Cover Stitching- Organ ELx705 Needle: Has a slightly longer scarf, a light ball point and 2 grooves and is made specifically for cover stitching.
Leather Point - 15x1LL (also known HAx2, 15x2, HAx1LL, 130LR or 130/705-H-LL): This flat shank needle has all the same features as the 15x1 with the addition of a lens shaped point to cut through leather and other heavy materials. Caution must be used when changing to this needle. Extra space must be left between needle penetrations to avoid 'cutting out' the design.
Organ HAx1BP SP or 15x1BP SP: A special version of the 15x1 needle made for stretch or elastic materials and tightly woven knits. This needle will work on any home serger that uses a flat shank needle.
Marathon Threads Canada stocks embroidery needles made specifically for the following machines:
Needle Guide
Reduce thread breakage, stitching problems, and needle breakage by choosing the needle type and size for the fabric and project. Change needles often for best results, ideally every 100,000 stitches for machine embroidery and 8 hours of stitching for straight sewing.
**Is your thread breaking? Is your needle making a popping sound^ Both of these are usually indications that it's time to change your needle.**
Regular Needles (Sharp)
Ball Point Needles (to use with knits, t-shirts, etc).
Hint: The lower the number, the smaller the needle size.
Marathon Embroidery Thread: We are told that Marathon threads sew out with better coverage than some other embroidery threads.
To estimate your thread consumption: On average, app. 6.5 yards of thread would be used per 1000 embroidery stitches. This varies depending on stitch length, fabric thickness, and tension for both the bobbin and the needle.
Marathon Viscose Rayon Embroidery Thread: Has natural fiber properties and produces beautiful lustrous designs. Rayon can be a little more sensitive to bleaching agents compared to polyester threads, but they may run through the embroidery machine cleaner and rayon produces an embroidery with a lovely sheen.
Marathon Polyester Embroidery Thread: Spun from synthetic fibers. It has more resistance to damage from chemicals compared to rayon e.g. bleach. Marathon's manufacturing process produces a quality thread with a much higher sheen and luster compared to some other polyester embroidery threads. Marathon Threads Canada customers tell us they can hardly tell the difference between embroideries stitched out in Marathon Polyester compared to those stitched with Marathon Rayon. They tell us Marathon Rayon threads retain colour and appearance well after wearing and washing, but you can expect the polyester to perform even better.
Marathon Metallic Embroidery Thread: Available in 17 colours including golds and silvers. Metallics can accent or enhance a beautiful design and give it that special finishing touch. Marathon metallic thread is a high quality thread that feels and acts like any other embroidery thread. It runs through the machine smoothly. It doesn't twist back on itself causing breakage. Use a special needle designed for metallic threads. Marathon's 15x1 ST needle has an oversized eye to reduce stress and tension on the thread. It was designed to accommodate metallic or heavy top-stitching threads for embroidery and decorative stitching. To use Marathon metallic thread in your bobbin, we suggest you wind your bobbin with metallic thread (wind at a slower speed if possible) and leave it to 'relax' overnight before embroidering with the bobbin.
Marathon 100% Rayon Variegated Embroidery Thread: Come in two types, Ombre and Multi. Ombre has different shades of the same colour varying from light to dark. Multi has a striped or multi-coloured effect using 2, 3 or 4 different colours. The variegated threads add extra texture or colour variation to your designs.
Bobbin Thread and Pre-Wound Bobbins: Wind your own bobbins using Marathon's 60/2 weight 100% polyester bobbin thread available in 11 colours or buy the pre-wound bobbins. The size L pre-wound bobbins come in polyester or nylon, some available in black and white. The polyester bobbins are available without sides, with paper sides, or with plastic sides. Most Singer, Kenmore, and Janome machines use a thicker bobbin, so ask for the plastic sided Size A bobbins.
Marathon Embroidery Thread Starter Kits & Hanging Box sets
Marathon Threads Canada makes it easy for the beginner embroiderer to choose a variety of threads. Choose from our many Rayon or Polyester Starter Kits that contain 50 different colours of Marathon threads. You can buy the kits individually or think of buying two kits that were designed to compliment each other, meaning there are few or no repeats between them. Kit #1 was designed to go with Kit #2, Kit #3 with Kit #8, and Kit #6 with Kit #7. We've also made it easy for those of you on a budget with our hanging boxes, these little kits have 6 threads, either sets of polyester, or rayon or variegated or even metallic or a combination of two types. We have 17 different hanging box sets for your convenience.
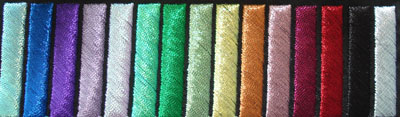
Rayon and Polyester Shade Cards – Marathon Threads: Can be ordered individually. The Rayon and Polyester Shade cards contain real-thread samples for accurate colour selection. The Metallic colours appear on both the Rayon and Polyester Shade Cards, and the Variegated colours appear on the Rayon Shade Card.
Variegated Thread Kit: Starter Kit #5 contains 14 Ombre and 6 Multi-coloured spools (1,000 mtr each). We also have two hanging boxes with ombre colours and three hanging boxes with either polyester, rayon or even metallic threads. These are wonderful stocking stuffers.
100% Polyester Cotton-Look Threads for Serging & Sewing: This cotton-look thread has double silicone, does not shrink, retains shape, recovers stretch and exhibits excellent resistance to chemicals. Available in beautiful matte finish colours. 5,000 mtr. (5,500 yd.) cones. Our cotton-look shade card contains real-thread samples for accurate colour selection. You can also see the colours in our catalog and on Marathon Threads Canada website.
40/3 Weight Polyester Sewing Thread: Cotton-look 100% polyester thread. Available in over 30 colours.
50/2 Weight Polyester Serging and Sewing Thread: Cotton-look 100% polyester. Available in 47 colours.
100% Cotton Thread
35 Weight (heavier) 100% Cotton Thread for Quilting and Sewing: This long-staple cotton thread is great for handwork or machines. This strong 3-ply thread can also be used for long-arm quilting and industrial machines as well. The mercerizing process leaves less fluff and lint in your machines enabling them to run cleaner. Ideal weight for decorative stitching projects, embroidery or quilting! Available in both 1000 m (1100 yds) and 2000 m (2200 yd) cones.
Lighter Weight 100% Cotton Thread for Quilting and Sewing: Marathon Threads Canada stocks 100% lighter-weight cotton thread for quilting, general sewing, serging, or embroidery. Since it is mercerized, a smoother, high quality thread is manufactured causing less wear and tear on the machine. This beautiful thread is available in both 1500 m. (1650 yd) and 3000 m. (3300 yd) cones.
Serger and Sewing Thread Kits: Marathon has collected 24 spools of the serger and sewing threads into kits. Each spool contains 500 mtrs. Available in 50/2 weight.
Marathon Threads Canada carries both pre-wound bobbins (Size A/class 15 and Size L) and cones of bobbin thread.
Pre-wound bobbins are wound much more uniformly on the core compared to winding your own bobbins. They hold more thread and run more evenly through the machine. Marathon's Pre-wound Bobbins come in polyester without sides (on a plastic core), with cardboard sides, or with plastic sides and in black or white. Marathon also carries Nylon Pre-wound bobbins, which are sideless and coreless.
The Size A, class 15 plastic sided pre-wound bobbin fits most Singer, Janome & Kenmore machines. It is a slightly thicker bobbin than the Size L to fit the larger bobbin case of these machines. The Size L pre-wound bobbin fits most other machine, including industrial machines.
Bobbin Thread: If you prefer to wind your own bobbins, Marathon Threads Canada carries a 100% Polyester 10,000 mtr cone, in black, white, and 9 colours.
We do not recommend using a size "L" bobbin with a dime in order to make a size "A" as this could void your warranty and/or cause damage to your machine. For optimal perfomance it is always recommended to use the correct size bobbin that the manufacturer recommends. Please refer to your users manual to find out which size is appropriate for your machine.
Creative Beginnings in Machine Embroidery by Patty Albin is an excellent resource for both the new and experienced embroiderer. Detailed instructions and clear photos cover the basics from equipment to supplies to embroidering tips. Don't be overwhelmed! Patty makes embroidering easy to attempt.
PLEASE REMEMBER that when doing machine embroidery, it is highly recommended to change your needle every 100,000 stitches (approximately 1 to1.5 hours of machine embroidery). While at the touch, your needle doesn't feel any different, the machine has to work harder because the needle is not as sharp on the edge. This will cause premature wear and tear on your machine.
Are you having trouble with thread breaking? Perhaps when you are changing threads, you are pulling the unused thread back thru the tension discs which may cause fluff to build up. Here is a tip, cut the thread at the top of the machine and pull the waste thru the needle (towards you) and discard (or do like me and save it for an artsy quilt). You might find that using this technique will make your life easier.
Here is a nifty tip about changing your needles. Make sure that you have a firm grip on that needle when unscrewing it otherwise it may fall into oblivion where you don't have access which may require you to have your machine serviced, to avoid this, you can change your needle while is threaded. This way if you drop the needle, you just pull on the thread to get it back OR you can put a piece of fabric under the needle before changing it. It could save you a servicing.
Other possible Embroidery Problems you may encounter:
Thread Breaks: Causes: Stitching too fast, incorrect needle size, burrs in needle eye, hook or throat plate, machine threaded incorrectly, incorrect needle bar height, tension adjustment needed, bent needle, machine needs lubrication, lint buildup, incorrect digitizing causing design to be too dense in an area, need for a silicon spray due to friction caused by thick fabrics or fabrics with treatments, pooling of thread which causes portions of the spool to wind off improperly. Use Incredible Tape to prevent this.
Needle Breakage: Causes: timing needs adjusting for needle & hook point, needle in machine incorrectly, bent/dull needle.
Thread Pileups on back of fabric (birds nests): Causes: tension adjustment needed, machine incorrectly threaded, thread might have jumped out of one of the thread guides.
Stitching not following pattern outline: Causes: bent needles, loose hoop in frame, inadequate hooping.
Flat stitching: Causes: tension tightness, topping film necessary on fabrics with a pile.
Looping: Causes: tension adjustment needed for tight fabric weaves, digitized with too many stitches.
Pigtailing: Cause: Top tension too tight.
Skipped stitches: Causes: wrong bobbin timing, incorrect needle size.
Puckering: Causes: tension too tight, backing not hooped the same tension as fabric, fabric hooped too tightly, using the wrong stabilizer for the project, needles not sharp enough, density of design too thick and needs to be increased in size slightly.
Poor performance with metallic threads: Causes: Sewing too fast, using wrong size needle, using an older needle. For optimal performance when using metallic threads, we recommend that you slow down your machine by 25%, use a new needle, preferably a size 14 regular or an 11 metallic. If you are also using metallic threads in your bobbin, wind at a slower speed AND leave the bobbin rest overnight, this will allow the thread to relax.
We embroiderers want to embroider beautiful designs on just about everything and today we have the machines that allow us to do just this. Each type of material poses its own problems with hooping and stabilisers and it can be really difficult knowing the best way to embroider on velvet, t-shirts, towels and suede – to name a few.
The good news is that somebody has gone to a lot of work to determine the best way to do all this and he has put all the information on his website for us to use. His name is Kenny from Embroidery Library and in his tutorials he covers just about everything from puckering and tension to choosing colours and embroidering in the hoop.
So, if you have ever wanted to embroider on fleece, spandex, sweaters, nylon, silk, faux fur, denim, tulle and even leather, go to emblibrary.com for detailed instructions.
Used with the kind permission of Embroidery Library.
There are so many types of stabilizers on the market today that it can be a problem figuring out what you need for your machine embroidery. This article covers the major types of stabilizers available and what materials they work best with. It gives you tips for working with difficult to hoop materials and some hints on hooping.
The major stabilizer categories covered here are:
There are many companies making stabilizers and their products have different names. For example, a water-soluble stabilizer made by Sulky is called Solvy while Floriani call theirs Wet N Gone. Marathon just calls theirs water-soluble stabilizer. Very confusing! Ultimately, most of the hundreds of stabilizer on the market can be grouped into these four categories and they will cover almost all your stabilizer needs.
Stabilizers come in different ‘weights’, e.g. light, medium and heavy and you select the weight that is right for your project. Tear-away and cut-away stabilizers often come in both black and white so you can match the colour to the material in your project. Most excess stabilizer is removed after the embroidery is completed and it is how it is removed that determines which category the stabilizer belongs to. So a tear-away stabilizer can tear in two or more directions and the excess is simply torn away after embroidering. The bit under the embroidery remains and adds more stability to the piece during use.
You must use a stabilizer when machine embroidering as it supports the fabric during the embroidery process and stops it slipping and distorting. You cannot produce a well-embroidered piece without using stabilizer.
And it is important to match the correct stabilizer to the fabric and to the design. If you are using a cotton material with a medium dense design, try using two layers of a lightweight tear-away. Some embroiderers prefer to use one layer of a medium to heavyweight tear-away stabilizer instead. There is no right answer – only guidelines - and you will need to experiment with a test piece for each new project.
1. Choose the right type of stabilizer for the fabric. Generally:
· Tearaways are used for woven fabrics such as cotton and denim as woven fabrics are more stable and don’t move as much in the hoop. Some tear-away stabilizers have an adhesive on side that is fused (ironed on) to the back of the fabric.
· Cutaways are used for stretch and knit (non-woven) fabrics as these are unstable fabrics and need the extra stability of a cutaway – which is more resistant to needle penetrations.
· Washaways are used whenever you want to remove the stabilizer completely after the piece is embroidered, e.g. free standing lace - but the fabric must be washable. Also used for toppings on napped materials.
· Topping film is used on top of material that has a high pile, e.g. towels, velvet, fleece and some knits. If you don’t use a topping, the stitches sink into the material and bits will poke out through the embroidery stitches. These are called ‘pokies’ and are to be avoided.
2. Choose the right weight of stabilizer for the fabric. Now we’re at the difficult part as there are no rules for this complex issue. You don’t just match a heavy weight stabilizer with a heavy weight material and the same for lightweight materials. Nor does it work by putting opposites together, e.g. putting a lightweight stabilizer with heavy material. Every combination of stabilizer and material has its own unique requirements. Take organza as an example. This is a very lightweight material that doesn’t stretch so it is stable. A heavyweight stabilizer would not work on such a lightweight fabric so a lightweight stabilizer would be the best choice. The fabric is also slippery and I would choose a lightweight stabilizer that provided the best protection against slippage – a fusible would be good. I would start with one layer of lightweight stabilizer and if there was any slippage, I would add another layer.
Fabrics that have a little or a lot of stretch are less stable than non-stretch fabrics so they need greater stabilization and possibly a heavier weight stabilizer or a fusible stabilizer.
The weight of the stabilizer ultimately comes down to stability and you need to work out what combination of stabilizer and material provides the best stability for the density of the design (see below). This is why you must do a test piece – even several test pieces to get it right.
3. Match the stabilizer to the design. The denser the design, the more stability has to be provided by a stabilizer to prevent distortion and puckering. A redwork design is usually low density (not many stitches in a given area) so does not need to be stabilized as much as a dense design that has multiple layers of thread in all or part of the design or a lot of fill stitches in a given area. Each time the needle penetrates the fabric and stabilizer, it leaves a hole. So the denser the design, the more needle penetrations there will be. Cut-away stabilizers are less resistant to needle penetrations than tear-aways (which is why cut-aways have to be cut and not torn away) and provide more stability during the embroidery process and afterwards, during normal wear and tear.
Free-standing lace is usually very dense so two or three layers of water soluble stabilizer are required to minimise distortion.
4. Use the least amount of stabilizer as possible. Start your test piece with one layer and, if there is puckering or the design is all over the place (outlines and registration marks don’t line up), add another layer. The thicker the stabilizer, the bulkier the finished piece will be.
5. Hoop the stabilizer properly. The stabilizer should be completely hooped with the material and have a minimum 2 cm border outside the hoop to keep the embroidery stable. Having said that, if I’ve started embroidering and I don’t feel that I’m using enough stabilizer, I’ll slip an extra layer between the hoop and the machine.
6. Use adhesive stabilizers with care. Tear-away stabilizers with fusible backings that are ironed on to the back of the material are often used to prevent the material and stabilizer separating (however slightly) during the embroidery process. Again, there is no wrong or right answer – some people swear by them other people won’t let gums and adhesives near their machine. See Hoopless Embroidery for Difficult Items and Materials, below.
If you like the idea of adhering the fabric and stabilizer together but don’t have a fusible stabilizer, you can use a spray adhesive – this is particularly useful when you want to adhere a cut-away stabilizer to the fabric. This adhesive must be made especially for material and NEVER spray it near the machine.
The embroidery is finished and it is time to remove the stabilizer. How you do it depends on the type of stabilizer used.
Tear-away stabilizer
Hold the embroidered section with one hand and tear the paper away from the embroidery – never into the embroidery as this will weaken the edges and may damage the design. If I don’t need to remove the stabilizer from the hard-to-access places, then I leave it there. It will provide support for the item during normal wear and tear. If it all has to come out, I carefully use small curved-tipped scissors and tweezers.
Cut-away stabilizer
This stabilizer has to be cut away and cannot be torn. Use the small curved-tip scissors to cut around the design. I put my finger between the stabilizer and the material and run the scissors along my finger to avoid cutting the material. Leave a small margin, if possible, to protect the edge of the design.
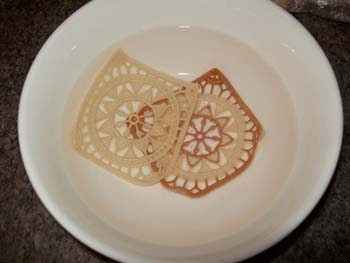
Water-soluble stabilizer
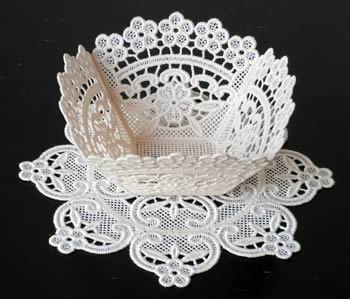
There is a tendency for the residue from water-soluble stabiliser to remain in the embroidered piece making the piece stiff and inflexible. This may be what you want if you are making a doily or lace segments for a bowl and you need the rigidity. Otherwise, you need to rinse as much of the stabilizer away as possible.
How to rinse out water-soluble stabilizer:
Silk, velvet, leather, suede and corduroy are just some material that shouldn’t be hooped –the pressure of the hoop causes a hoop ‘burn’ that cannot be removed so these materials are embroidered using the hoopless embroidery technique. This means that only the stabilizer is hooped and the material is stuck to the stabilizer using double-sided tape or spray on adhesive.
How to use double-sided tape for hoopless embroidery:
How to use spray on adhesive for hoopless embroidery:
Use either of these two methods to embroider towels and items that can’t fit into a hoop, e.g. the edge of a napkin and collars.
These are only suggestions and you must test your own combination.
But you don’t have to stick to these guidelines and I often use a cutaway on cotton material when I’m embroidering a dense design. The frequency and type of use also impacts on a garment, e.g. I would use a cut-away for a cotton garment that will receive a lot of machine washing as it will provide more protection against wear and tear.
You will not get a good result if you do not hoop the stabilizer and fabric properly. The material and stabilizer must be smooth and wrinkle free and must not be loose. Any loose material will be taken up by the embroidery and will result in puckering and distortion.
Most embroidery hoops have an inner and outer hoop with a tightening device such as a screw. The material is sandwiched between the inner and outer hoops.
The tension in a tightened hoop is not evenly distributed and will be looser at the screw area. Therefore, it is necessary to tighten the screw then remove the inner hoop to distribute the tension and re-hoop.
How to hoop material:
Never stretch the fabric once it has been hooped. It will just relax back into place after you remove the hoop and will result in puckering.
Hooping knits and other stretchy items can be difficult so you may want to use a fusible stabilizer or a spray adhesive first.
And lastly - only ever carry your hooped fabric by holding the hoop itself, otherwise you will stretch the fabric.
Here are other great tips from Embroidery Library.
Metallic Threads add a zing and sparkle to your embroidery but they are notoriously difficult to use. The good news is that they can be tamed by understanding why they behave the way they do and by following these guidelines that will help prevent thread breakages.
There are many different types of metallic thread but most are basically a core fibre covered with a coating of metallic foil. For example, the Marathon threads 3004 to 3007 have a rayon core covered with polyester film that is metallised with silver.
This metallic coating means that metallic threads are not soft and supple like rayon threads – they are stiffer and do not drape as well. This is what makes them more of a challenge to use as when the thread unwinds from the reel, it can ‘kink’ and twist around itself. When this loop meets a thread guide, the resulting tension problem can cause the thread to break.
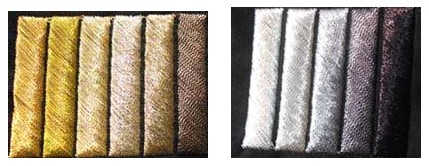
Here is a series of stitch outs using metallic and rayon threads to show how the look of the designs vary according to the type of thread used.
1. Embroidered in all metallic thread.

2. Embroidered in rayon and metallic threads.
3. Embroidered in an ‘old gold’ colour in rayon to give the appearance of metallic thread without the extra work involved. Marathon thread 1187.

Metallic threads come in many wonderful colours so experiment beyond the gold and silver.
And experiment with the different golds and silvers.
Sew a sample – it is always worth the time and effort
Always stitch a sample piece first using the same materials you’ll be using for your embroidery. Experiment with top tension, stabilizer, sewing speed, and needle and with ways of minimising kinking.
Follow these guidelines to tame your thread and to reduce thread breaks.
4. Loosen the top tension on your machine. Metallic thread is generally thicker than the 40–weight that your machine has been optimized for and certainly not as flexible. Each machine is different so experiment to find the best setting for you. I reduce my top tension by 50% or more, depending on the fabric and the density of the design.
5. Slow down the machine. This reduces the amount of tension on the thread and how much it stretches – then breaks. Again, experiment with different speeds when you do your sample piece. Start with a slow speed and, if you’re not having problems, increase it a little. Repeat this until the thread breaks and you’ll know what is too fast for your machine, with this design on this fabric. I prefer to slow right down (20% - 40% of maximum speed) and take more time embroidering and less time dealing with thread breaks.
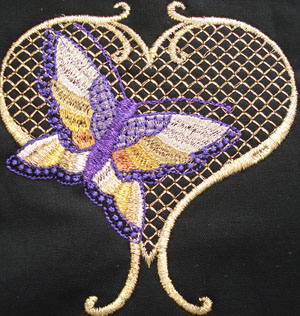
6. Choose the right design – not all designs can, or should, be embroidered with metallic thread. Dense designs can result in the thread nesting underneath and consequent thread breaks. This butterfly design was embroidered in metallic threads with a rayon thread for the outline of the body. The design at the centre is very dense and caused nesting on the back.
Also avoid designs that have a lot of small stitches and overlapping sections. Remember, you can be selective and use metallic thread to only embroider a specific part of the design – enough to add the zing and highlight.
7. Choose a lightweight bobbin thread. A 60-weight bobbin thread (such as the Marathon bobbin thread and pre-wound bobbins) is ideal. I have heard of people using metallic thread in the bobbin but I have not tried this myself. When the back of the embroidered piece will be seen, I use a rayon thread (in a similar colour to the metallic thread) in the bobbin.
8. Use the right stabilizer. Metallic thread usually works better with a stabilizer that has a viscose or cotton component in them. Stabilizers with 100% can be too sturdy and create too much friction with needle and thread and increase the chance of thread breaks. Avoid thick and abrasive stabilizers and iron on stabilizers - the adhesive can build up on the needle and thread and the drag increases the friction.
9. Use the right fabric. A medium weight natural fabric (like cotton) is best suited to embroidery with metallic threads. Tightly woven, stiff and thick materials do not work as they increase unwanted friction while fine fabrics (like organza) are extremely difficult to use but can be worth the effort. Metallic thread can even be used on light cardboard and card stock if the design is not dense.

10. Freeze the thread for a few minutes before you use it. I have not tried it but if you’re still having problems after trying all the above suggestions – give it a go!
Written by Elaine Raahauge - business writer and home embroiderer
If you have a tip we have not included here or you have a question we can answer, please send us an email at sales@marathonaustralia.com.au, we will do our best to answer the question.
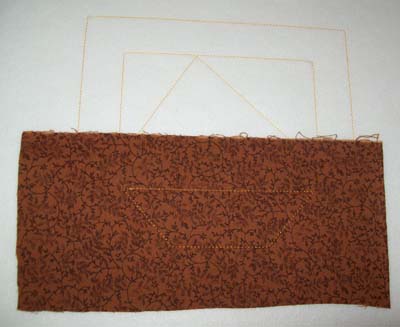
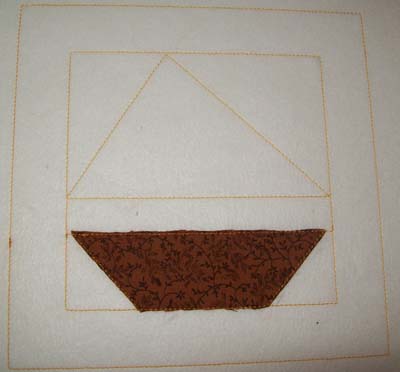
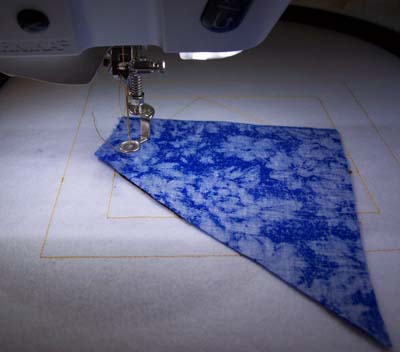
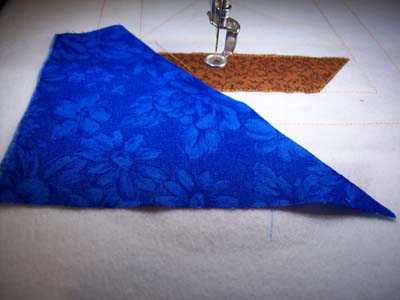
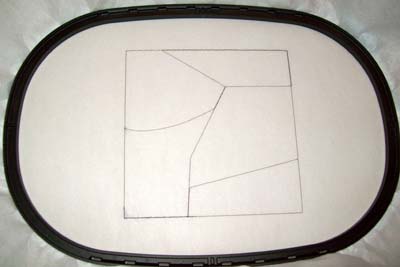
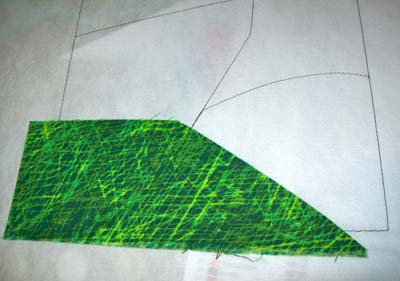
Embroidery machines today do much more than embroider and there are creative digitizers out there who are finding new ways for us to use our embroidery machines – including creating a patchwork block in your embroidery hoop by a method called piecing in the hoop. This is similar to foundation piecing but, as all the stitches are programmed into the embroidery design, the completed block is much more accurate.
This tutorial covers some of the basics of piecing in the hoop but each designer creates their designs differently so you cannot religiously follow the steps detailed here for all designs. I have written this tutorial to show you what is possible with your embroidery machine and to encourage you to create beautiful and fun things.
Follow these instructions to create this fun quilt block entirely in the embroidery hoop.
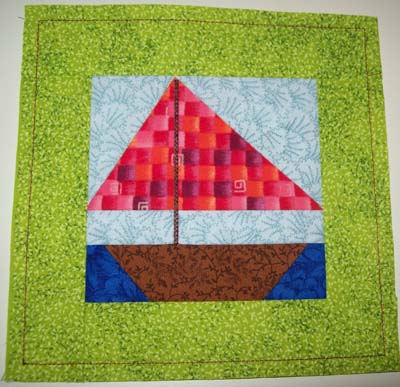
If you have ever tried paper or foundation piecing then you’ll know that you can create patchwork blocks by layering pieces of material one over the other, in sequence, and stitching them down. Well, this is the same except each seam is considered a piece of embroidery and the whole block is created in the hoop.
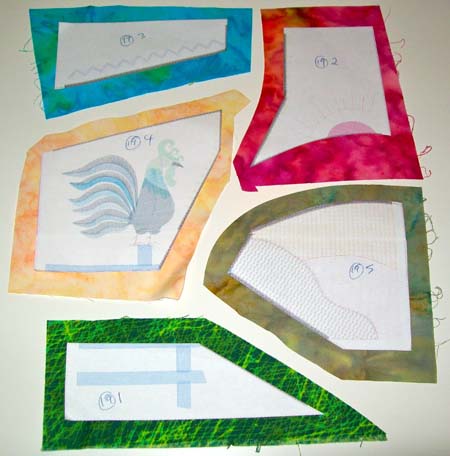
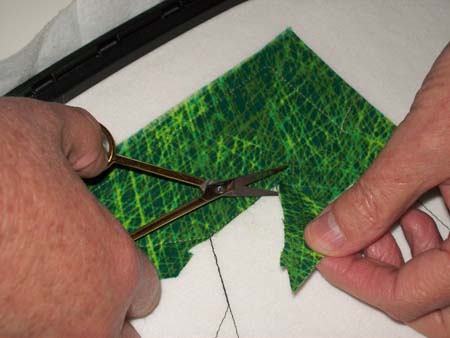
There are six things you need to create a patchwork block similar to the boat block demonstrated here:
There are a lot of thread colours at the beginning of the block but it is not necessary to change the actual thread. They are called thread stops and are put there by the designer to stop the machine so you can place, or trim, the patchwork piece of material. Therefore, it is not necessary to change your thread each time there is a thread stop as this thread will not be seen. In the steps for Creating the patchwork block (below), it is not necessary to change the thread colour until step 11.


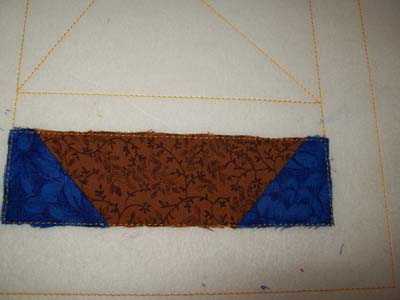
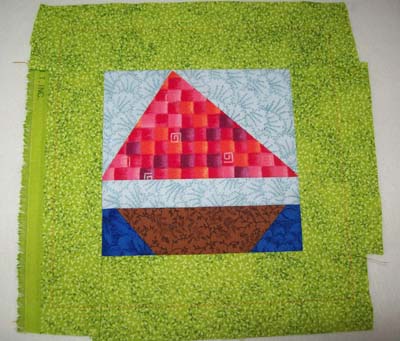
Trim the finished block and remove the stabilizer, if required.
Written by Elaine Raahauge - business writer and home embroiderer
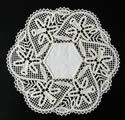
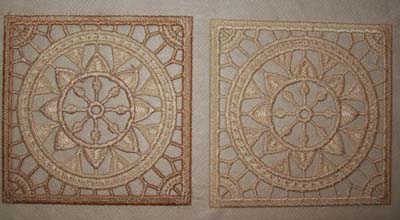
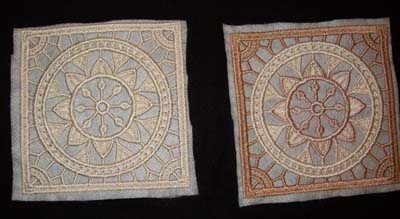
You can make beautiful free standing lace (FSL) using your embroidery machine. This is lace that is meant to stand alone and is not embroidered onto other material (except possibly organza – more about that later).
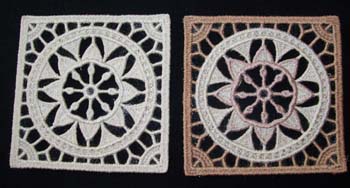
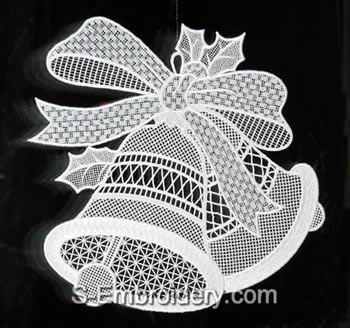
The sample squares I made for this tutorial can be joined together to make a doily or even a tablecloth. You can make FSL to put on the edge of sheets or a tablecloth (why not make a tablecloth with cutwork corners and a lace trim). Other uses include Christmas ornaments, bookmarks, lace bowls or you can appliqué the lace to clothing. You can make beautiful 3D items, such as a flower or butterfly, by hooping a layer of netting or organza with the water-soluble stabilizer.
These items show what can be made using the FSL technique. These designs are digitized by Stanislava Krachunova of S-Embroidery and these samples are shown with the kind permission of the designer.

There are only four items you need to make FSL:
Join the finished pieces of FSL (on the wrong side) by butting them together and using invisible thread and a zigzag stitch on your sewing machine. You can also use the same colour rayon thread to join the pieces.
Go to s-embroidery.com for more tutorials on FSL including how to attach the lace to material to make this beautiful table runner. There are free designs that you can download – including a FSL Christmas stocking.

Written by Elaine Raahauge - business writer and home embroiderer
Silk, velvet, leather, suede and corduroy are just some material that shouldn’t be hooped –the pressure of the hoop causes a hoop ‘burn’ that cannot be removed so these materials are embroidered using the hoopless embroidery technique. This means that only the stabilizer is hooped and the material is stuck to the stabilizer using double-sided tape or spray on adhesive.
Use either of these two methods to embroider towels and items that can’t fit into a hoop, e.g. the edge of a napkin and collars.
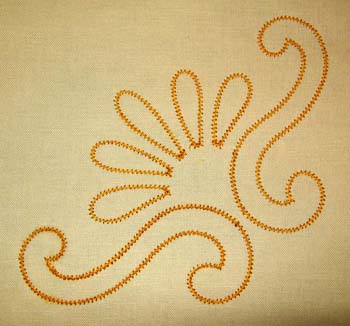
Cutwork is making a comeback in fashion but few people have the time or the skills to create a beautiful cutwork tablecloth or blouse by hand. Fortunately, it doesn’t matter, as your embroidery machine will give you perfect results in a fraction of the time.
Follow the instructions in this tutorial to create this lovely cutwork design entirely in the embroidery hoop.
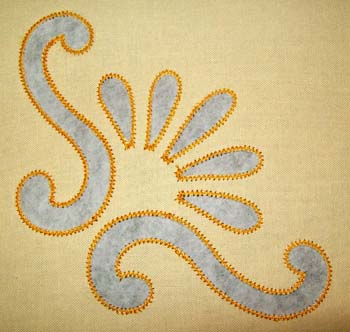
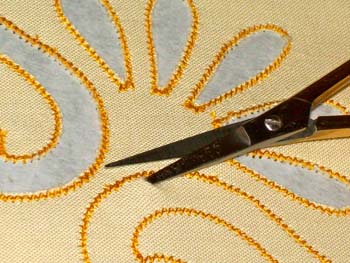
This is a technique where you cut out specific areas of your material and your machine embroiders (usually a satin stitch) around the cut edges to seal them. These cut out areas are usually connected by Richelieu bars, or bridges, which help the piece keep its shape after the stabilizer is removed.
The supplies you need will depend on whether or not the material to be embroidered can be hooped. See Dealing with items that cannot be hooped, see below.
Some items cannot be hooped, such as the edge of a napkin. Use the hoopless embroidery technique, then follow these instructions to embroider the cutwork.
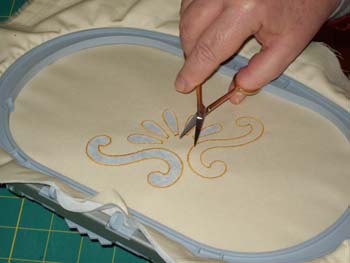
To make the initial cut, lightly place a finger underneath the hooped material (being careful not to stretch the material) and use it to feel if the scissors has penetrated the stabilizer. I like to slide the point of the scissors into the material at an angle almost level to the fabric as this reduces the chance of piecing the stabilizer.


Here are some of the 24 designs from theVintage Cutwork (Set 1) Hatched in Africa design.
Beautiful cutwork designs can also be purchased from s-embroidery.com. They also have a cutwork tutorial and a free cutwork design to download and try.
Written by Elaine Raahauge - business writer and home embroiderer
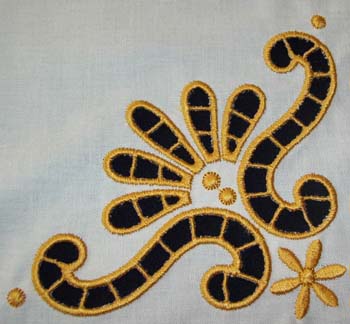
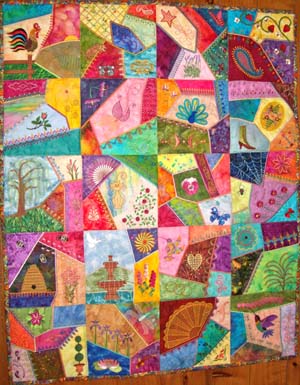
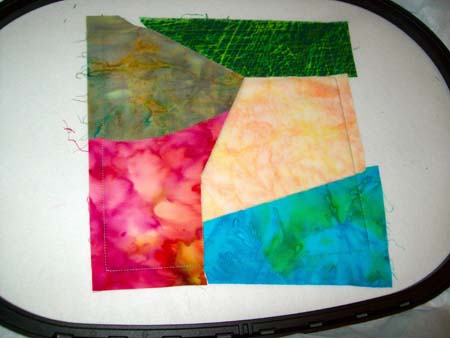
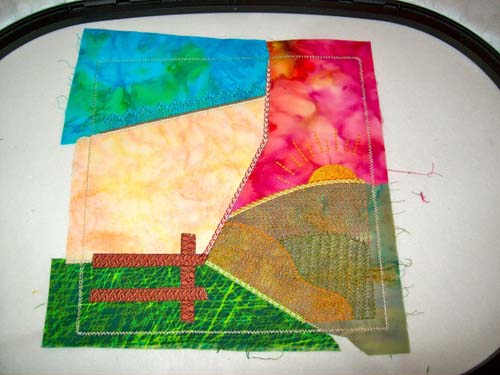
You can make appliqué blocks decorated with beautiful embroidery all in one step within your embroidery hoop. This tutorial uses a crazy quilt block to demonstrate how easy and fast it is to create a fun block that can be joined with others to make a crazy quilt.
This tutorial covers some of the basics of appliquéing in the hoop but each designer creates their designs differently so you cannot religiously follow the steps detailed here for all designs. I have written this tutorial to show you what is possible with your embroidery machine and to encourage you to create beautiful and fun things.
Follow these instructions to create this fun quilt block entirely in the embroidery hoop.
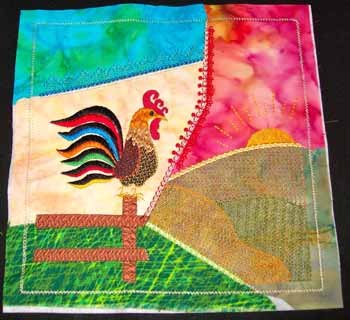
These blocks can be joined together to make a quilt or wall hanging.
Appliqué in the hoop has many variations but it is basically where the embroidery machine appliqués pieces of material onto a background – usually a stabilizer. The machine stitches the outline of the block (including the placement lines for each piece of fabric) onto the hooped stabilizer. Individual pieces of material are laid over the outlines, stitched, then cut into the right shape. The machine joins the fabric together (usually with a satin stitch) then embellishes the block with embroidery. The result is an appliqué block that has been completed using only your embroidery machine.
There are five things you need to create an appliqué block similar to the crazy quilt block demonstrated here:
5. A small pair of scissors with a thin, sharp point. This is required for cutting away the excess material close to the sewing line and your curved embroidery scissors will not work here.
There are a lot of thread colours at the beginning of the block but it is not necessary for you to change the actual thread. They are called thread stops and are put there by the designer to stop the machine so you can place, or trim, the appliqué piece. Therefore, it is not necessary to change your thread each time there is a thread stop as this thread will not be seen. In the steps for embroidering the appliqué block (below), it is not necessary to change the thread colour until step 8.
Written by Elaine Raahauge – business writer and home embroiderer
Question: I have viewed your tutorial on Crazy Quilting. Can you please help me out as I make my quilts as "quilt as you go" so would I be able to use the embroidered designs for crazy quilts as a quilt block - ie top, wadding and backing in the all in one go? I am very interested in the design in the hoop crazy quilt, but it will not work if maybe the 'sandwich' was too thick? The designs in the hoop are so decorative that there would be little or no space to quilt in the traditional way - ie do the top and then layer. (Jenny N. from UK)
Suggestion: I embroidered my crazy quilt pattern directly onto a hooped cut-away stabilizer - laying down the fabric over the stabilizer, as required. Once all the blocks were completed, I removed the stabilizer from the seam line only then joined the blocks together with a quarter inch seam. I laid the quilt top over the backing and connected the two together by zig-zagging over the seam lines (from the front) I did not quilt the quilt as it doesn't need it and there is nowhere to quilt anyway.
I will try and explain why I did it this way and give you other options.
You can use anything as the base for the block. I chose the cut-away stabilizer because it is easy to hoop and it provides a solid foundation to build on. You could hoop a tear-away stabilizer and baste a layer of wadding (not too thick) over the stabilizer and lay the fabric directly onto the wadding. I have never hooped wading by itself and have no idea if this would work well. I would be worried about it stretching during the embroidering. Therefore, I recommend you use a stabilizer base with it. You can remove the tear-away stabilizer afterwards, if you want.
You can even use a layer of material as the base and then baste the wadding onto that. You may not even want to use wadding as it is really not required (as there is no quilting to enhance). If I was doing this again, I would hoop a layer of flannel and lay the applique fabric directly onto this. No matter what base material you use, the quilt will be stiff as there is so much decorative stitching on the blocks. If you use wadding, use the thinnest possible.
There is no way you would want to include the quilt backing in the layering in the hoop as you wouldn't want the back of the embroidery to be visible in the finished quilt. The backing has to be added after the embroidery is finished.
This is really a wall hanging rather than a quilt and is quite small. I have a large embroidery hoop and my blocks are 200mm x 200mm. If you don't have this sized hoop, you can make smaller blocks to fit your hoop. Therefore, you won't have a large and cumbersome quilt to fight with.
- Elaine Raahauge
Beautiful Marathon Embroidery threads have been available in Australia for more than 26 years now, supplying commercial embroiderers and people who simply love creating beautiful designs with machine embroidery at home.