Embroidery machines today do much more than embroider and there are creative digitizers out there who are finding new ways for us to use our embroidery machines – including creating a patchwork block in your embroidery hoop by a method called piecing in the hoop. This is similar to foundation piecing but, as all the stitches are programmed into the embroidery design, the completed block is much more accurate.
This tutorial covers some of the basics of piecing in the hoop but each designer creates their designs differently so you cannot religiously follow the steps detailed here for all designs. I have written this tutorial to show you what is possible with your embroidery machine and to encourage you to create beautiful and fun things.
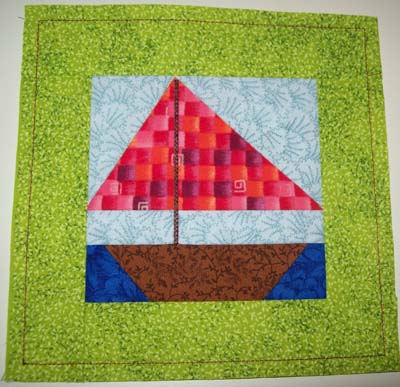
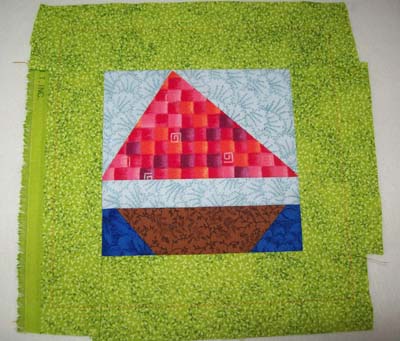
Follow these instructions to create this fun quilt block entirely in the embroidery hoop.
What is piecing in the hoop?
If you have ever tried paper or foundation piecing then you’ll know that you can create patchwork blocks by layering pieces of material one over the other, in sequence, and stitching them down. Well, this is the same except each seam is considered a piece of embroidery and the whole block is created in the hoop.
What you need for piecing in the hoop
There are six things you need to create a patchwork block similar to the boat block demonstrated here:
- An embroidery design specifically for this purpose.
- A foundation for the block. This can be a piece of material, stabilizer or batting (wadding). I use a medium weight cut-away stabilizer as I want it to remain to support the block after it has been completed. You can use a tear- away or a water-soluble stabilizer if you want a softer, more flexible finish like traditionally pieced blocks.
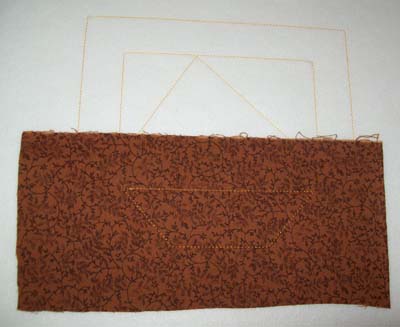
- Material for the block pieces. I use traditional cottons for my boat and cut them roughly to shape but bigger than the design.
- Marathon rayon thread. You only need one colour to create the block plus extra colours if you choose to embroider a design in the block.
- A small pair of scissors with a thin, sharp point. This is required for cutting away the excess material close to the sewing line and your curved embroidery scissors will not work here.
- Spray on appliqué adhesive to adhere the appliqué material to the base material, if required. Optional.
Getting ready
- Read the instructions that come with the design and print them out if required.
- Print the template, if applicable, and cut into sections.
- Hoop your selected foundation material, e.g. stabilizer.
- Download your design to your machine.
- Select your material and threads.
- Pre-wind your bobbins or buy pre-wound bobbins.
- Cut out the material using the template as a guide or eyeball it.
A note about thread colours
There are a lot of thread colours at the beginning of the block but it is not necessary to change the actual thread. They are called thread stops and are put there by the designer to stop the machine so you can place, or trim, the patchwork piece of material. Therefore, it is not necessary to change your thread each time there is a thread stop as this thread will not be seen. In the steps for Creating the patchwork block (below), it is not necessary to change the thread colour until step 11.
Creating the patchwork block
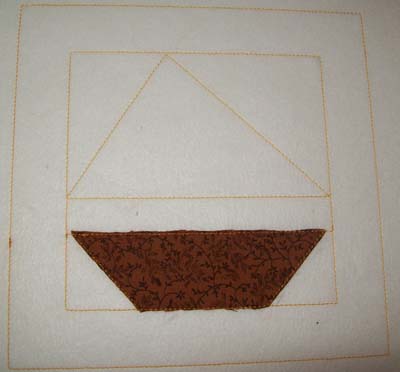
- Embroider the first colour onto the batting, stabilizer or base material. This is usually the outline of the block showing the individual sections.
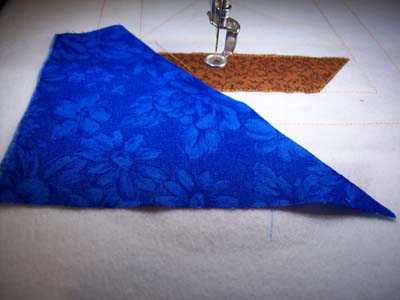
- Lay down the first piece of material cover section 1 making sure it completely covers the section outline. The fabric may be face up or face down - follow the instructions for your design. You can use a spray-on appliqué adhesive to stick the appliqué fabric to the base material, if required.
- Embroider the second colour – remember it is not necessary to change the thread colour. This will stitch the material to the base material.
- Remove the hoop from the machine but DO NOT REMOVE THE MATERIAL FROM THE HOOP.
- Trim away the excess material. You may or may not need to leave a ¼ inch seam – again, follow the instructions for your specific design.
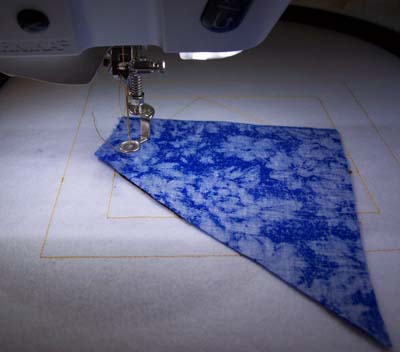
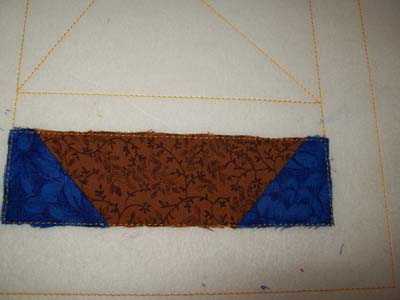
- Place the second piece of material. This will usually be face down, over the first piece.
- Embroider the next colour and turn the fabric right side up.
- Embroider the next colour to stitch the material into place.
- Remove the hoop and trim away the excess material. The boat after both pieces of the water have been stitched down and trimmed.
- Repeat steps 6 to 9 until all the material has been stitched into place.
- Embroider any pattern or details that are included in the design. You will need to use the specified thread colours from this point. The mast of the boat is embroidered.
- Remove the hoop from the machine and the block from the hoop.
Trim the finished block and remove the stabilizer, if required.
Written by Elaine Raahauge - business writer and home embroiderer